That 55” smart TV in your break room or gathering dust in storage? It can become a professional-looking digital sign in about 30 minutes. No specialized hardware needed—you can leverage existing hardware for your digital signage setup, making it simple and accessible.
This guide walks you through everything: checking your existing equipment, which is a cost effective way for organizations to turn a TV into a digital sign, choosing the right setup path, installing signage software, and building your first content loop. Whether you’re running a café, managing an office lobby, or coordinating school announcements, you’ll find practical steps and real costs to get started today.
Key Takeaways
Most modern TVs manufactured after roughly 2015 typically have HDMI ports and/or a built-in smart OS (Android TV, webOS, Tizen, or Roku), making them suitable for use as digital signs. The entire setup process typically takes under 30 minutes for a basic implementation, making it accessible even for non-technical users.
You have two main paths forward: use your smart TV’s built-in apps for simple, low-cost deployments, or plug in a small external media player like an Amazon Fire TV Stick 4K Max for 24/7 reliability in customer-facing locations. The external player approach costs around $50 but offers better stability and auto-recovery features, and HDMI ports are essential for connecting these devices.
Content management happens in the cloud rather than through clunky USB sticks. You upload images and videos, build playlists, and schedule campaigns from a web dashboard accessible from any laptop or phone. Changes push to your screen within minutes.
Realistic startup costs range from $0-$150 for hardware if you already own a suitable TV, plus software subscriptions from free tiers up to approximately $10-$20 per screen per month. This approach is highly cost effective, providing a budget-friendly solution for organizations looking to maximize value without significant financial investment. A complete new setup with a 55” 4K TV runs roughly $400-500 total.
Real-world applications span digital menu boards, lobby welcome screens, KPI dashboards, and promotional displays. You can start with a single TV today and scale to dozens of screens across multiple locations later using the same platform and workflow, allowing organizations to efficiently manage and synchronize their digital signage networks.
What Does “Turning a TV Into a Digital Sign” Actually Mean?
At its core, you’re repurposing any flat-panel television as an always-on information screen, leveraging existing hardware for digital signage. Instead of cable channels or streaming movies, your TV loops through curated content—images, videos, announcements, menus, presentations—controlled remotely from your laptop or phone.
Think of a 55” Samsung smart TV in a café cycling through breakfast specials, lunch combos, and loyalty program promotions. Or a 43” LG TV in a school hallway displaying bell schedules, club announcements, and upcoming event dates. Or a 65” Sony Bravia in a corporate lobby greeting visitors by name and showing company news.
The setup relies on three basic building blocks working together:
- The TV (screen): Any flat-panel display with HDMI connectivity or a smart operating system
- A media player: Either the TV’s built-in smart platform or an external device like a streaming stick, mini-PC, or any Android device
- Digital signage software: A cloud-based content management system where you upload media, build playlists, and schedule what plays when
Why Use a TV as Digital Signage Instead of “Pro” Displays?
Walk into Best Buy or browse Amazon, and you’ll find dozens of consumer 4K TVs priced between $350-450 for a 55” model. Compare that to commercial signage displays from Samsung or LG’s professional lines, which run $800-$1,500 for equivalent screen sizes. For many businesses, especially those starting out, that price gap matters. Using existing hardware like standard TVs is a cost effective way to turn a TV into a digital sign, providing a budget-friendly solution without significant financial investment.
Beyond cost, consumer TVs offer practical advantages that commercial displays don’t:
- Availability: Order today, receive tomorrow with standard shipping—no waiting on specialized AV distributors
- Familiarity: Your staff already knows how to plug in, mount, and operate a regular TV
- Accessories: Standard VESA mounts, cables, and brackets work perfectly and cost less
- Returns: Easy return policies at major retailers if something doesn’t work out
- Leverage existing hardware: You can use TVs you already own, reducing setup costs and simplifying implementation
The tradeoffs exist, but they’re manageable for most indoor applications:
- Operating hours: Consumer TVs aren’t rated for 24/7 use—plan for 12-16 hours daily with overnight rest periods
- Brightness: Most TVs output 250-400 nits, which works fine indoors but struggles against direct sunlight. Most modern TVs support the necessary features for digital signage, such as Wi-Fi and HDMI connectivity, though they may have limitations for continuous or commercial use.
- Warranty considerations: Many consumer warranties technically exclude commercial use, though enforcement varies
A TV is “good enough” for indoor menus, office lobbies, school hallways, healthcare waiting rooms, and retail floors away from windows. Consider commercial displays for bright shop windows, outdoor enclosures, or true 24/7 operation requirements.

Step-by-Step: Turn Your TV Into a Digital Sign in One Afternoon
This is your core how-to section. Follow these steps chronologically, and you’ll have a working digital sign before dinner. Taking the right approach ensures your digital signage setup is effective and successful. The process breaks down into: checking your TV, choosing your hardware path, physical setup, software installation, cloud pairing, content creation, and testing.
Each step includes specific actions you can complete in 10-20 minutes. Non-technical users routinely finish the entire process in 1-3 hours.
Step 1: Check If Your Existing TV Is Suitable
- Verify HDMI Port:
-
Ensure at least one HDMI port exists—most modern TVs are equipped with HDMI ports, which are essential for connecting media players and other devices for digital signage. This covers virtually all models from Samsung, LG, Sony, TCL, and Vizio from 2015 onward.
- Ensure at least one HDMI port exists—most modern TVs are equipped with HDMI ports, which are essential for connecting media players and other devices for digital signage. This covers virtually all models from Samsung, LG, Sony, TCL, and Vizio from 2015 onward.
- Identify Smart TV OS:
-
If it’s a smart TV, identify the operating system: Android TV/Google TV (Sony, TCL), Samsung Tizen (look for “2020 TU8000” or similar model designations), LG webOS (e.g., UN7300), Roku TV, or Fire TV Edition.
- If it’s a smart TV, identify the operating system: Android TV/Google TV (Sony, TCL), Samsung Tizen (look for “2020 TU8000” or similar model designations), LG webOS (e.g., UN7300), Roku TV, or Fire TV Edition.
- Check Connectivity:
-
Look for built-in Wi-Fi or an Ethernet port in the settings menu or on the back panel.
- Look for built-in Wi-Fi or an Ethernet port in the settings menu or on the back panel.
- Note Model and Year:
-
Note your model number and year (e.g., “Samsung UN55NU6900 2018”) for looking up app compatibility.
- Note your model number and year (e.g., “Samsung UN55NU6900 2018”) for looking up app compatibility.
If your TV lacks smart features entirely, don’t worry—an external media player solves this. If there’s no internet connectivity, you can still run offline content loops via USB, though you’ll lose cloud features like remote management.
Step 2: Decide Between Smart TV Apps and an External Media Player
This decision shapes your entire setup. Using the TV’s built-in apps costs nothing extra and keeps things simple. Using an external device like an Amazon signage stick (Fire TV Stick 4K Max) adds $50-60 but delivers better reliability for business-critical screens. The exact setup steps may vary depending on the device and software you choose.
Choose the smart TV path when:
- Running 1-3 screens in non-critical areas
- Content plays less than 12-16 hours daily
- Locations include internal break rooms, small waiting areas, or back-office dashboards
- Budget is extremely tight
Choose an external digital signage player when:
When doing so, it helps to understand the multiple features you need to look for in a digital signage player, such as remote management, reliability, and layout support.
- Screens are customer-facing and revenue-impacting (menus, promotions)
- You need precise scheduling and offline caching
- Managing multiple TVs from one dashboard
- 24/7 or near-24/7 operation is required
Device Options Table
|
Device |
Approximate Cost |
Best For |
|---|---|---|
|
Amazon Fire TV Stick 4K Max (2023) |
$50-60 |
Reliable business use, offline caching |
|
Chromecast with Google TV 4K |
~$50 |
Google ecosystem integration |
|
Roku Streaming Stick 4K |
$40-50 |
Simple interface, budget option |
|
Intel N100 Mini PC |
$150-250 |
Advanced integrations, Windows apps |
|
Any Android device |
Varies |
Flexible signage player, wide compatibility |
|
Raspberry Pi |
Varies |
Cost-effective, customizable solution |
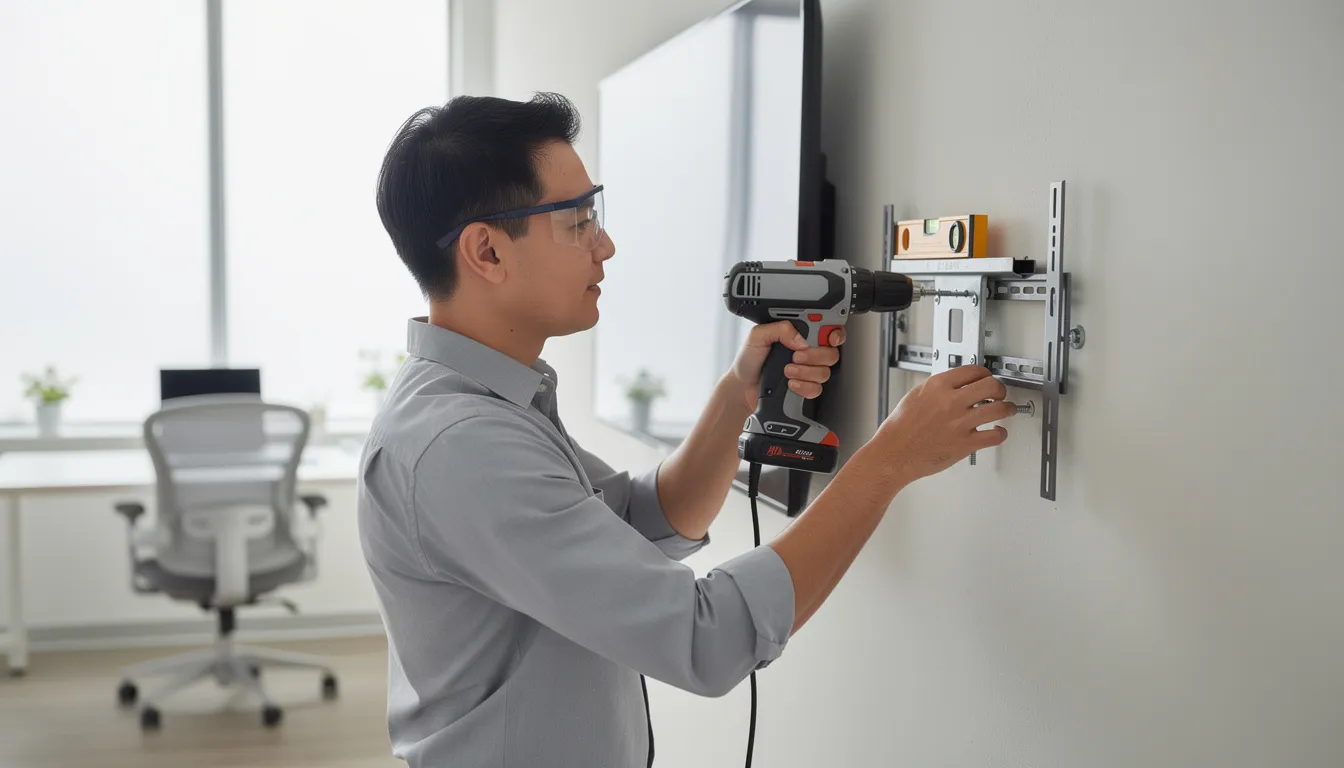
Step 3: Physically Set Up the TV as a Digital Sign
- Choose High-Visibility Spots:
-
Near entrances, above checkout counters, in main corridors, or facing waiting areas.
- Near entrances, above checkout counters, in main corridors, or facing waiting areas.
- Mount at Appropriate Height:
-
Eye level works best, typically 5-6 feet from floor to screen center; tilt mounts help when screens must go higher.
- Eye level works best, typically 5-6 feet from floor to screen center; tilt mounts help when screens must go higher.
- Select Orientation:
-
Landscape (horizontal) for menus and dashboards; portrait (vertical) for social media feeds, directories, or digital posters.
- Landscape (horizontal) for menus and dashboards; portrait (vertical) for social media feeds, directories, or digital posters.
- Use Appropriate VESA Mounts:
-
200×200 or 400×400 patterns cover most 43”-65” TVs; verify your TV’s VESA specs before purchasing.
- 200×200 or 400×400 patterns cover most 43”-65” TVs; verify your TV’s VESA specs before purchasing.
- Plan Power and Network:
-
Place TVs near power outlets, run Ethernet cable when possible for reliability, or ensure strong Wi-Fi coverage (access point within 10-15 meters).
- Place TVs near power outlets, run Ethernet cable when possible for reliability, or ensure strong Wi-Fi coverage (access point within 10-15 meters).
- Tidy Cables Professionally:
-
Use cable channels, conduit, or zip ties—messy cables undermine the professional appearance you’re creating.
- Use cable channels, conduit, or zip ties—messy cables undermine the professional appearance you’re creating.
Step 4: Install the Digital Signage App or Player Software
For Android TV / Google TV (Sony Bravia, Chromecast with Google TV):
- Open Google Play Store from the home screen.
- Search for your chosen signage app.
- Install the app, then open it and grant requested permissions.
- Enable “keep screen on” and “launch app on startup” in device settings.
Note: The signage app can also be installed on any Android device, including Android-based commercial displays and signage sticks. This provides flexibility if you want to use an Android device other than a TV, such as a Signage Stick or compatible tablet, and you can configure it to automatically launch your digital signage on Android TV whenever the device starts up.
For Amazon Fire TV (Fire TV Stick 4K Max, Fire TV Edition TVs):
- Navigate to the Fire TV Appstore.
- Search for and install your signage app.
- In Settings > Device > Developer Options, enable “Apps from Unknown Sources” if required.
- Configure auto-start on boot through the app’s settings.
If you’re using SignageTube, you can follow a dedicated guide on installing SignageTube Cloud APK on Amazon Fire TV Stick to get up and running quickly.
For Samsung Tizen and LG webOS smart TVs:
- Access the built-in app store (Samsung Apps or LG Content Store).
- Search for compatible signage apps; install if available.
- If no native app exists, use the built-in web browser pointed to a full-screen URL from your signage platform.
For Windows, macOS, or Linux mini-PCs:
- Download the player software from your signage vendor’s website.
- Install and log in with your account credentials.
- Configure the app to launch at startup through system settings.
You can also install digital signage software on a Raspberry Pi device. Many signage platforms provide specific setup instructions for Raspberry Pi, making it a cost-effective and flexible option for turning your TV into a digital sign.
Critical settings to enable regardless of platform:
- Disable power saving and sleep modes
- Disable “auto power off” timers
- Enable app auto-launch on boot
- Keep screen awake during playback
Step 5: Connect the Screen to Your Online Dashboard
- After launching the signage app, a pairing code or device ID appears on screen (e.g., “ABCD-1234”).
- On your laptop or desktop browser, sign into your signage platform’s dashboard.
- Click “Add Screen,” “Register Device,” or similar.
- Enter the pairing code shown on your TV.
- Give the screen a descriptive name like “Lobby-TV-1,” “Menu-Board-Kitchen,” or “Breakroom-Main.”
- Within 60 seconds, the TV appears online and ready to receive content.
This pairing is what enables your organization to manage content, push updates, and monitor status from one dashboard—even across multiple locations, ensuring a seamless experience across all your digital signage screens.
Step 6: Upload Content, Create Playlists, and Schedule Playback
Most content management systems support various types of media and rely on a structure of digital signage media files, playlists, and channels to organize what plays where and when:
- Images: JPEG, PNG (typically under 10MB each)
- Videos: MP4 format, up to 4K resolution
- Documents: PDFs for menus, policies, or announcements
- Presentations: PowerPoint or Google Slides presentations for engaging visual content and slideshows
- Web content: embedded dashboards, Google Slides, YouTube Live streams, weather widgets
- Social media feeds: Instagram, Facebook, or X/Twitter integrations
Building your first playlist:
- Upload 10-20 assets (images, short videos, branded slides, presentations).
- Drag and drop to arrange sequence.
- Set durations: 8-12 seconds for images, full length for videos.
- Preview the loop before publishing.
Setting up scheduling:
- Assign playlists to time ranges (breakfast menu 6:00-10:30 AM, lunch 10:30 AM-3:00 PM).
- Create day-specific rules (weekend versus weekday content).
- Schedule content for specific dates (Black Friday promotions, holiday hours, event schedules).
Example: A café owner creates a 60-second loop with 5 slides: logo/welcome (8 sec), breakfast special (12 sec), lunch combo (12 sec), loyalty program QR code (12 sec), and live Instagram feed (16 sec). Different playlists run for morning versus afternoon.
Step 7: Test, Optimize, and Put the TV Into Daily Use
- Check readability: Can you read all text from the furthest viewing distance? Minimum 36-48 point fonts for 10-15 foot viewing.
- Adjust brightness and contrast: Switch from “Standard” to “Dynamic” or “Vivid” picture mode, then fine-tune to avoid oversaturation.
- Test audio levels (if applicable): Confirm volume is audible but not intrusive to staff or customers.
- Evaluate loop length: Match typical dwell time—30-90 seconds for checkout lines, 3-5 minutes for waiting rooms.
- Verify auto-recovery: Unplug the TV, wait 30 seconds, plug it back in—confirm the signage app restarts automatically.
Set a calendar reminder to review and refresh content at least monthly. Stale screens lose up to 50% of their engagement value.
Choosing the Right TV and Hardware for Digital Signage
While almost any modern TV works, a few hardware decisions significantly impact how professional the result looks and how long the setup lasts. Whether you’re repurposing an existing TV or purchasing new equipment, leveraging existing hardware is a cost effective way to turn a TV into digital signage, allowing organizations to maximize value and minimize financial investment. Understanding size, resolution, brightness, and media player options helps you make smarter choices.
TV Size, Resolution, and Placement
Match your screen size to viewing distance and the space type:
|
Screen Size |
Ideal Viewing Distance |
Best Applications |
|---|---|---|
|
43”-50” 4K |
6-10 feet |
Small lobbies, counters, reception desks |
|
55”-65” 4K |
10-20 feet |
Restaurant dining rooms, retail floors, corridors |
|
70”+ |
20+ feet |
Large venues, conference halls, outdoor events |
Rule of thumb: Screen size in inches should be roughly 1.5-2 times the viewing distance in feet.
For new purchases, choose 4K resolution (3840×2160) even if your content is still 1080p. 4K TVs have dropped below $400 for 55” models in 2026, and the extra resolution makes text and logos significantly sharper.
Portrait installations require both a TV and mount that support secure vertical mounting. Check manufacturer documentation before rotating a consumer TV—not all panels handle portrait orientation safely.
Brightness, Durability, and Operating Hours
Consumer TVs typically output 250-400 nits brightness, perfectly adequate for indoor spaces with controlled lighting. Direct sunlight or bright shop-front windows will wash out the image.
Managing brightness limitations:
- Use blinds or curtains to control window glare
- Apply anti-glare film if repositioning isn’t possible
- Reserve commercial high-brightness displays (500+ nits) for true sunlit installations
- The need for higher brightness or commercial displays may vary depending on the installation environment.
Operating hours guidance:
- Target 12-16 hours daily for consumer TVs
- Schedule automatic “screen off” periods overnight (midnight to 6 AM, for example)
- Vary content to prevent static images from causing image retention
Real-world example: Many grocery and convenience stores run 50” Vizio or TCL sets from 6:00 AM to 11:00 PM daily for promotions, achieving years of reliable service by cycling dynamic content and giving screens overnight rest.
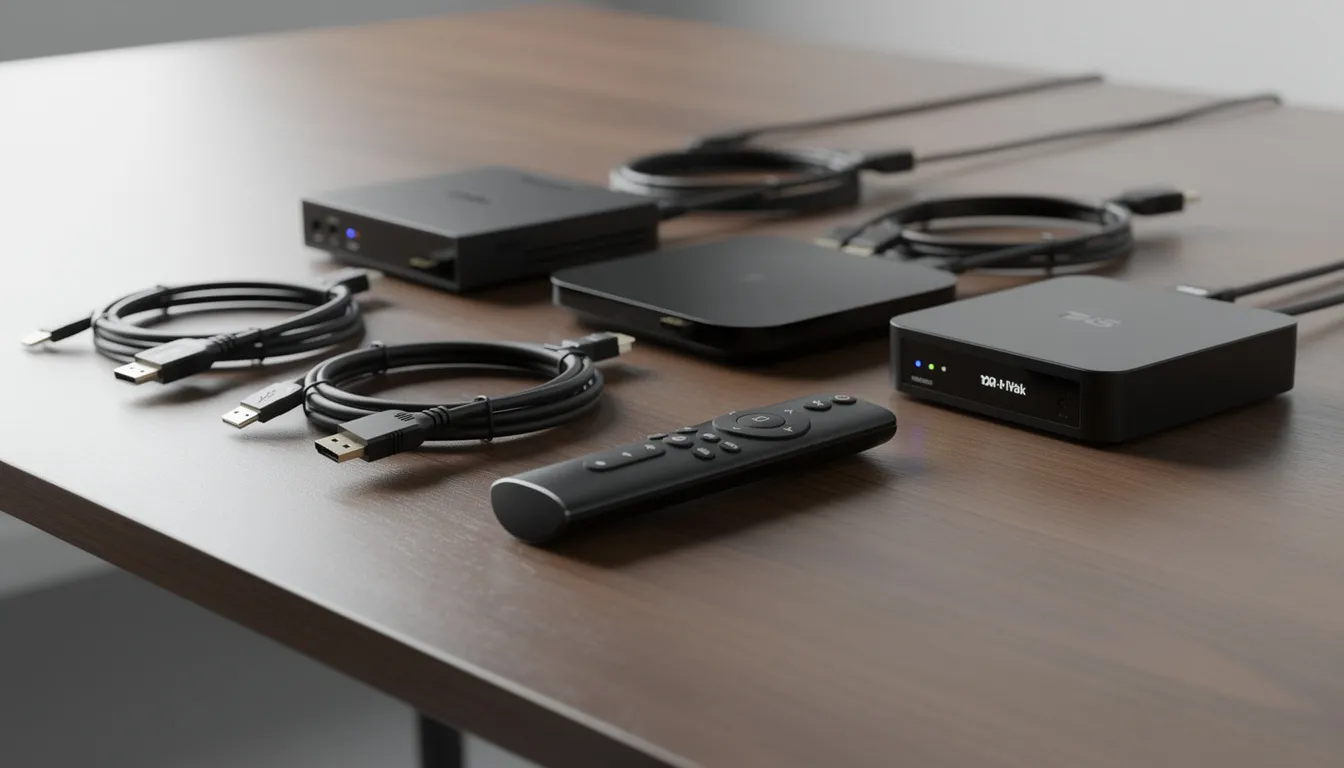
Media Player Options: From Streaming Sticks to Mini PCs
The dedicated media player runs your signage app and connects to the cloud. Choosing the right one impacts stability, features, and ease of management.
Media Player Options Table
|
Device Type |
Cost |
Pros |
Cons |
Best For |
|---|---|---|---|---|
|
Streaming sticks |
$40-60 |
Compact, affordable, easy setup |
Limited processing power for complex layouts |
Single screens, small deployments, standard playlists |
|
Small form-factor PCs |
$150-250 |
Run Windows/Linux apps, handle multi-zone layouts, corporate network integration |
Higher cost, more complex setup |
Advanced dashboards, Power BI integration, multi-source displays |
|
Raspberry Pi |
Varies |
Low-cost, flexible for DIY setups |
Requires more technical setup |
DIY, hobbyist, flexible deployments |
|
Dedicated signage players |
$100-200 |
Pre-configured for 24/7 operation, commercial support |
Less flexible than general-purpose devices |
Large deployments with professional installation |
Mount players behind the TV using VESA brackets or adhesive mounts. Ensure continuous power—avoid plugging into USB ports that power off with the TV. Configure auto-boot into the signage app so recovery happens automatically after power outages.
Content Strategy: What to Actually Show on Your TV Digital Sign
Hardware gets the screen on the wall. Content makes it valuable. A powerful communication tool requires compelling, regularly updated media—such as presentations, which can be an effective form of content for digital signage—that serves your specific needs and keeps your audience engaged.
Core Content Types That Work Well on TV Signs
- Static slides and images:
- Branded promotional graphics
- Seasonal offers and limited-time deals
- Event announcements with dates and times
- Staff spotlights and team recognition
- Company news and milestone celebrations
- Presentations (PowerPoint, Google Slides)
- Video loops:
- 15-60 second product demonstrations
- Behind-the-scenes footage
- Customer testimonials
- How-to guides for complex products
- Live data and real time content:
- Weather widgets for lobbies
- News tickers (filtered by topic)
- KPI dashboards from Power BI or Google Data Studio
- Sales leaderboards and team metrics
- Web and social content:
- Embedded booking or ordering pages
- QR codes linking to online menus or sign-ups
- Social media feeds from Instagram, Facebook, or X/Twitter
- Google Reviews or testimonial aggregators
Tailoring by venue type:
- Restaurants: Breakfast/lunch/dinner menus with scheduled transitions, upsell items, health tips, and allergy information
- Retail stores: New arrivals, sale announcements, user-generated content, loyalty program explanations
- Offices: Meeting room schedules, visitor welcome boards, OKRs and team goals, emergency alerts
- Schools: Bell schedules, club promotions, cafeteria menus, spirit week announcements
- Healthcare: Queue information, educational health content, wellness reminders, staff recognition
Design Best Practices for Readable, High-Impact Screens
- Large fonts, minimal text: No more than 6-10 words per line, 3-5 key points per slide
- High contrast colors: Dark text on light backgrounds (or vice versa) stays readable from 10-20 feet
- One message per slide: Avoid cramming multiple promotions onto a single image
- Generous whitespace: Let content breathe; cluttered screens feel chaotic
- Consistent branding: Logo in the same corner on every slide, consistent color palette
- Respect safe areas: Keep critical text and logos 5-10% away from edges to avoid cropping or overscan
Use templates sized for 16:9 landscape (1920×1080 or 3840×2160) or 9:16 portrait. Tools like Canva or PowerPoint export designs at these resolutions, ready for upload.
Keeping Content Fresh Without Overwhelming Your Team
Stale content defeats the purpose. Build a sustainable update cadence:
|
Frequency |
Content Type |
|---|---|
|
Daily |
Time-sensitive items: specials, daily greetings, emergency notices |
|
Weekly |
Promotions, event calendars, team metrics, social media highlights |
|
Monthly |
Seasonal campaigns, policy updates, branding refreshes |
|
Quarterly |
Major redesigns, new product launches, strategic messaging |
Making it sustainable:
- Assign clear ownership (marketing manager, office admin, or designated team member)
- Use a shared content calendar in Google Calendar or Trello
- Create a library of 15-30 reusable evergreen slides (“About Us,” “Review Us,” “Follow Us”) that anchor any playlist
- Batch content creation: spend 2 hours monthly preparing the next 4 weeks of material
Technical Considerations: Network, Power, and Reliability
Once content is running, your main concerns shift to staying online, surviving power interruptions, and preventing the TV from going to sleep. Most issues stem from overlooked settings rather than complex technical problems.
Network and Bandwidth
Most signage solutions cache content locally on the media player. Once downloaded, loops continue playing even if connectivity drops temporarily.
Bandwidth requirements:
- 5-25 Mbps per site (not per screen) handles most deployments
- Cached HD loops play back at under 1 Mbps
- Live streams and real-time data need consistent connectivity
Connectivity recommendations:
- Use wired Ethernet for fixed installations—more reliable than Wi-Fi in busy environments
- If using wireless, choose 5 GHz networks for less interference
- Position access points within 10-15 meters without metal or concrete obstructions
- Consider separating signage traffic onto its own SSID or VLAN
Real-world example: A café running a 25 Mbps broadband connection successfully operates two 4K digital signs plus POS systems without issues, because content caches locally and plays offline.
Power, Sleep Settings, and Auto-Recovery
Configure TVs and players so signs recover automatically after power outages or scheduled overnight shutdowns.
Essential settings:
- Disable “Eco mode” and energy-saving features on the TV
- Turn off “Auto Power Off after 4 hours” timers
- Enable “Restart on power loss” on the media player
- Configure the signage app to auto-launch at boot
- Consider HDMI-CEC settings for player-controlled power management
Additional reliability measures:
- Use a consumer-grade UPS ($50-100) for critical screens to bridge short outages
- Schedule intentional reboot windows (e.g., 3:00 AM daily) if your platform supports it
- Test the full power-off/power-on sequence during initial setup
Security and Access Control Basics
Even small signage deployments touch your network security. Basic hygiene prevents headaches.
- Use strong, unique passwords for the signage dashboard
- Enable multi-factor authentication (MFA) where available
- Assign role-based permissions: separate content editors from administrators
- Physically secure media players behind TVs or in locked enclosures
- Disable unused USB ports on public-facing TVs when possible
- Lock or remove TV remotes from public areas to prevent tampering
Businesses with IT departments should consult them before connecting multiple screens across locations, especially when displaying internal dashboards or sensitive data.
Use Cases: Where TV Digital Signage Delivers the Most Value
Digital signage delivers measurable returns when placed strategically. If you’re unsure whether now is the right moment, it helps to recognize the clear signals that it’s time to invest in digital signage. Here’s where businesses see the strongest impact across various types of organizations.
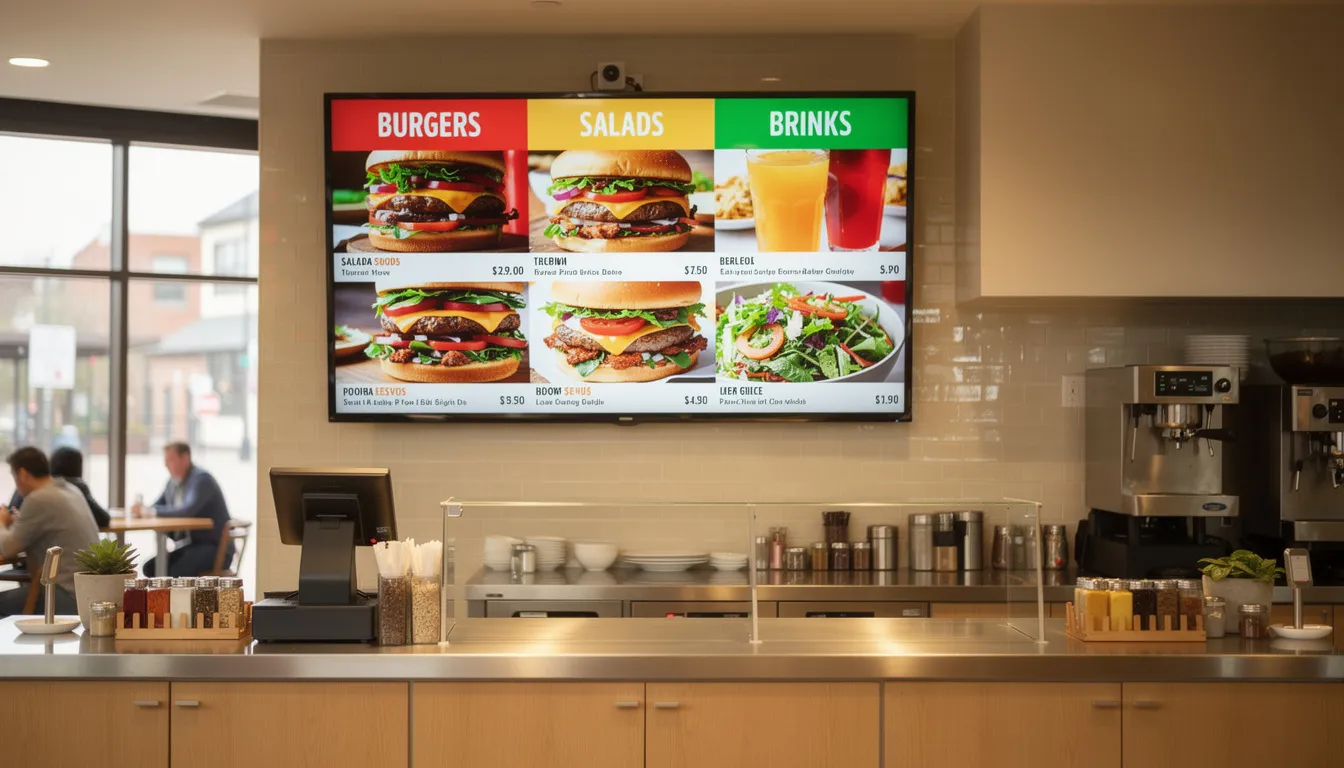
Hospitality and Restaurants
Restaurants represent one of the strongest use cases for TV-based digital signage. Cloud-based digital menu board solutions for service-based businesses make it easy to update prices, promotions, and items in real time, and a digital signage network across even 2-3 screens can transform customer experience.
Typical setups:
- 55” TV above the counter as a digital menu board, rotating breakfast/lunch/dinner menus on scheduled time slots
- 43” TV near the entrance displaying wait times, online reviews, and QR codes for mobile ordering
- Back-of-house screen showing order queue and kitchen metrics
Content that drives results:
- Daily specials with countdown timers
- Upsell items (drinks, sides, desserts) shown during checkout
- Event promotions (live music, sports screenings, holiday hours)
- Allergy and nutrition information for accessibility
Industry data suggests digital menu boards can lift sales by 25% through improved visibility and strategic upselling. The ability to schedule content throughout the day without manual intervention saves staff time and ensures consistency.
Retail and Showrooms
Retail environments benefit from different content strategies at various customer journey points.
Effective placements:
- 65” TV near fitting rooms showcasing outfit combinations and style tips
- 43” screens near checkout promoting add-ons, warranties, or gift cards
- Entrance displays featuring new arrivals and seasonal campaigns
Content strategies:
- “New This Week” collections with arrival dates
- Social proof via customer photos and reviews
- How-to videos for complex products (electronics, tools, appliances)
- QR codes driving in-store customers to e-commerce wishlists
The ability to display different content on multiple screens from one dashboard keeps messaging coordinated while allowing location-specific customization.
Offices, Schools, and Healthcare
Internal communications benefit significantly from centralized digital signage setup.
Office applications: Many organizations use office TVs to display company announcements on office screens and broader corporate content on workplace digital signage to keep staff informed and aligned.
- Lobby welcome screens listing scheduled visitors and meeting rooms
- Open-office dashboards showing team KPIs, sales goals, and project status
- Break room screens with company news, HR announcements, and recognition programs
Educational settings:
- Hallway and cafeteria TVs showing announcements, bell schedules, and event calendars
- Athletic department screens with game schedules and team highlights
- Emergency messaging capabilities triggered centrally when needed
Healthcare environments:
- Waiting room displays with queue information and estimated wait times
- Educational content on preventive care and wellness
- Staff-only screens in break rooms with shift information and policy updates
All these applications run from the same signage platform and can be controlled centrally, even across multiple buildings and locations, providing a seamless experience for both administrators and viewers.
Costs, Timelines, and Scaling Up
You can realistically get a first pilot screen running the same day with modest costs if you already own a suitable TV, making use of existing hardware for a cost effective digital signage solution. Understanding typical expenses helps you budget appropriately and plan for growth.
Typical Startup Costs for a Single Screen
Repurposing an existing TV:
|
Item |
Cost Range |
|---|---|
|
Fire TV Stick 4K Max or similar |
$50-60 |
|
Basic wall mount and hardware |
$30-60 |
|
Digital signage software |
Free tier to $10-20/month |
|
Total (existing TV) |
$80-140 + software |
|
Leveraging existing hardware, such as a standard TV you already own, is a highly cost effective way to turn a TV into digital signage. This approach minimizes upfront expenses and makes digital signage accessible for organizations on a budget. |
|
Purchasing new equipment:
|
Item |
Cost Range |
|---|---|
|
55” 4K TV (TCL, Vizio, or similar) |
$350-450 |
|
Media player |
$50-60 |
|
Mount and installation hardware |
$30-100 |
|
Software subscription |
Free tier to $20/month |
|
Total (new setup) |
$430-610 + software |
|
Professional installation adds $100-200 if you prefer outside labor for mounting and cabling. Many free digital signage software options include limited free plans that work well for single-screen pilots. |
|
How Long It Takes to Get Up and Running
A realistic same-day timeline for a single screen:
- Morning (1 hour): Mount TV or place on stand, plug in media player, connect to Wi-Fi or Ethernet
- Midday (30-45 minutes): Sign up for signage software, pair the screen, upload 10-20 starter assets
- Afternoon (30-45 minutes): Build initial playlist, schedule your first day’s loop, test and adjust settings
Total time for non-technical users: 2-3 hours once hardware arrives on site.
Multi-site or multi-screen rollouts require more planning, but per-screen setup time drops to 15-30 minutes once you’ve established a standard configuration. Clone settings and playlists to accelerate deployment.
Scaling From 1 TV to Dozens of Digital Signs
Once your first screen proves successful, the same approach scales efficiently.
Replication strategies:
- Clone settings and playlists to new screens with minor customization
- Standardize on one or two TV sizes and one media player model for simplified support and spare parts
- Create template playlists for different screen purposes (menus, lobbies, internal dashboards)
Managing multiple screens:
- Group screens by location (“Store-01”, “Store-02”) or purpose (“Menus”, “Lobbies”, “Back-Office”)
- Use bulk actions to push content updates to many screens simultaneously
- Monitor uptime and content status from a central dashboard rather than checking each display physically
- Organizations can maintain a seamless experience across all locations by standardizing digital signage processes, ensuring consistent branding and communication on every screen.
Planning for growth:
- Establish naming conventions early (Location-Function-Number format works well)
- Document your standard setup process so future staff can add or replace screens easily
- Budget for software tier upgrades as screen counts grow beyond free plan limits
FAQ
Can I use an older TV (before 2015) as a digital sign?
Yes, as long as the TV has an HDMI input—HDMI ports allow you to connect a wide range of devices, including Android devices, Raspberry Pi, Fire TV Stick, or mini-PC—for digital signage, and the TV functions reliably, an external media player makes it work. Limitations include no built-in smart apps, potentially lower resolution (720p or early 1080p), thicker bezels, and less energy efficiency. If the TV is over 10 years old or only supports 720p, upgrading to a modern 4K unit improves text clarity and provides better long-term reliability for around $300-400.
Will my TV be damaged if it runs digital signage all day?
Modern TVs generally handle extended daily operation well, but consumer models aren’t designed for 24/7 use like commercial displays. Practical habits extend lifespan: give the screen 6-8 hours of rest overnight, avoid displaying static images for extended periods (rotate dynamic content to prevent image retention), and use moderate brightness settings rather than maximum output. If true 24/7 operation is required, consider manufacturer documentation and plan to eventually transition to commercial-grade screens.
Can I run digital signage without an internet connection?
Many signage solutions cache content locally on the media player, allowing playback to continue even when connectivity drops. An internet connection is required for initial setup, content updates, and remote management features. Fully offline setups using USB sticks or local-only players work but require manual updates at each TV location and don’t support remote changes or live data feeds.
Do I need speakers or audio for my digital signage TV?
Many effective digital signs operate completely silent, relying entirely on visuals. Audio adds value in specific contexts: waiting rooms with educational content, retail environments with background music and narrated promotions, or hospitality settings with ambiance. Consider noise regulations, customer comfort, and nearby staff before enabling looping audio. Test volume levels at different times of day to find appropriate settings that inform without annoying.
What happens if the power goes out or someone turns the TV off?
With proper configuration—auto-power-on enabled on the TV, auto-launch configured for the signage app, and possibly HDMI-CEC control from the media player—content resumes automatically when power returns. Disable or lock down remote controls where feasible, and consider physical covers or control-panel locks on public-facing TVs to prevent tampering. Test the complete power-off/power-on sequence during initial setup to confirm your sign recovers without manual intervention. A basic UPS provides additional protection for critical screens in areas with frequent power fluctuations.